Showing posts with label crochet. Show all posts

Monday, January 27, 2014

Cold!

It is cold outside! And has been for several days.  I have been very content to stay inside and knit and sew.

Mary is running a Fair Isle class at the shop and we are making these fingerless mitts.  This is my first one; I am doing the ribbing on the second one.  That white line that looks like a mistake will be cut open (steeked-eek!) for my thumb.

DSC03745

Last year I started crocheting a large granny square to make a knitting bag. I lost the directions so I fudged a lining for it.

DSC03750

I have to tack a couple more spots but I am pleased with it. I used a dark batik so I would not have to line it.  I added snaps and pockets on the inside.

DSC03749

One more set of Civil War blocks almost done! 4 are completely sewn; 4 need to be completed.  Can you see how they are different?

DSC03747

DSC03748

I thought some of you “older” sewers would appreciate this. I still have several of my mother-in-law’s sewing supplies.  While I never recommend using old thread, I used this carpet thread to attach the ling to my knitting bag.  Check out the price:

DSC03752

Do you remember when?

Diane

Saturday, February 16, 2013

Biscornu

A biscornu is a small, 8-sided, stuffed ornamental pincushion, usually made out of Aida cloth or linen. Embroidery or cross-stitch is used to decorate the top… (definition from wikipedia)
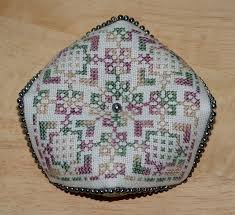
I have been fascinated by these little gems for quite a while. They are actually very easy to make-once you get past the embroidery and beading…

Anyways I also saw this on facebook:

         Photo: What a gorgeous little project! The pattern is available here: http://www.ravelry.com/patterns/library/hexagon-pincushion

The pattern is available on Ravelry at

http://www.ravelry.com/patterns/library/hexagon-pincushion

So I decided to have a little fun and I made this:DSC03533

Certainly not as fancy but I think it is cute! Here is the other side:

DSC03534

Unfortunately the little biscornu inside is obscured but I still enjoyed making it.  It is about 4 inches square.

This is how I made it:

I started with 2 charm square and 2 granny squares I had in my stash (What? You don’t have extra granny squares laying around?) The granny squares are about 4” square.

DSC03511

Draw your seam lines on the back of the fabric at 1/2”. I cheated and used a 4” sq. ruler to mark my charm patches. Also mark the halfway points on your square,  I put hash marks. I hope you can see them.

DSC03512

You are going to start by sewing one corner of one square to the center of one side of the other square right sides together.  I sewed by hand but if you are brave you can use your sewing machine. Just make sure you don’t sew into the seam allowance. 

DSC03513

Your first seam will look like this:

DSC03514

In the above picture the corner of the top square is matched up to the center of the seam line on the bottom square.  I sewed to the center of the seam of the top square which is pinned to the corner of the bottom square.  I know it sounds confusing but it is simple to do.

Then you will sew from the center of your top  square (which is at the corner of your bottom square-stay with me here!!) to your next corner (which is at the center of your bottom square)

DSC03515

Continue to sew around matching the corner from one square to the center of the side seam of the other square.

DSC03516DSC03517DSC03518

Keep sewing until you have one section left to sew (You will have sewn 7 sections.)

Are you still with me? Great! You will have something that looks like the picture below:

DSC03522

Clip your corners:

DSC03523

Turn right side out and push out your points.

DSC03525

At this point I like to press my seam allowance to the inside.

DSC03526

Stuff, and sew the last end closed.  At this point you can call it done and attach two buttons (one on top and one on the bottom) to give the biscornu some dimension.  Or you can cover the whole thing with 2 granny squares!

DSC03527

You will crochet the two squares together just like you sewed the fabric liner: corner to center of each side.

DSC03529

I just used a single crochet to sew them together:

DSC03530DSC03531

When you are almost done, pop the liner inside and finish crocheting the edges together.

DSC03532

I made a simple edging by doing a single crochet, chain 3, skip 1 space and single crochet all around.

DSC03533

Attach your buttons and you are done!  The whole pincushion took about 1 and 1/2 hours. If I do another one, I will make my granny squares with a DK or sport weight yarn. Enjoy!

sig2

Friday, April 20, 2012

Finally… It Is Done!

And I am so happy! The afghan is done-including weaving in the ends and putting on an edging.

DSC03139

DSC03138DSC03139

As you can see. it is pretty big-it is on a queen size bed.  There are 20 colors in it-and white. It took me two winters to finish it (no summer crocheting!) and it is very heavy! I was very toasty while making it.

And now?

I am making a pair of socks.  Yes, Adrienne, I am making socks! Now don’t laugh at me.  The pattern calls for DK weight so I picked up an acrylic at the shop.  I know that it is baby yarn-but I wanted to work on something I like and I like this yarn!

DSC03140DSC03143

I am taking a class- I made my first swatch and learned a new cast on.  I hope to have both socks completed to the heel (aka- the hard part) by next month’s class.

If these work out I will tackle a pattern with some more pizzazz!

Saturday, February 25, 2012

What Do YOU Think?

I admit that I have been holding on to this picture for a couple of weeks and I have forgotten most of the details.  This purse was shown at Fashion Week and costs thousands of dollars.

designer-crochet-bag

Of course my first thought was “I could make that!”  Sometimes I think it is pretty cool and sometimes I think, it is kind of, well, not too pretty.

So, what do YOU think?

Monday, August 1, 2011

Something Old….

I have been feeling lazy lately so I pulled out a project I started two years ago. It is an English paper-pieced (EPP) table runner.

DSC02451

I thought that I would highlight how to make them with this week’s video, but none of the videos I looked at showed the way I do them.

So here is a tutorial!

EPP is ridiculously easy but here are some hints(I have learned along the way) to make the process go more smoothly.

DSC02459

Two good notions to have are a paper punch and straw needles.  I love the straw needles! they are comfy in my chubby hands and long enough to use easily.  Much nicer than sharps.  Use the paper punch to pop a hole in each of your papers.

DSC02460

You can make your own papers; this site has several sizes available.  You can also buy your papers (there are several sites-and your local quilt store; I won’t list them here).  I use card stock.  They are reusable; also since I don’t sew through them, they are more stable (this will make sense in a bit!)

I have cut fabric to shape but now I use squares of fabric.  Hexagons are measured by the side.  A one inch hexagon is 1” on each side.  That is the size I am using.  I cut a 2 1/2” square for a 1” hexagon.

DSC02457

DSC02458

OK! Let’s start!

Center your paper hexagon on your square of fabric.  I angle mine a little to give me more wiggle room.  Pin the paper to your fabric through the hole.  This allows the paper to float free.

DSC02461

Thread your needle with thread-but not too long!  18” is good.  This is a good time to use up that old thread.  Unless you use very dark thread on very light fabric it will not show through.

Fold the fabric at your first corner under and take a stitch.

DSC02463

Do not go through the paper!  We are only basting the fabric. I take two stitches at each corner; one would probably be enough but my luck does not always run that way..

Go to the next corner.  Fold the fabric under and take a stitch.

DSC02464DSC02465

Remember-just go through the fabric! Can you see the basting stitch between the stitches (sorry about the thumb!)

Stitch the next corner…

DSC02466

…and the next..

DSC02467

2 more stitches…

DSC02468

You’re done!  I take 3 stitches on the last corner and then just cut the thread.

DSC02469

DSC02470

DSC02471

Next time I will show you how I put the pieces together.

Oh! did I show you this yet?

DSC02472

It is a placemat I crocheted last month.  I got the pattern from Purl Bee, but I changed the edging row.