A biscornu is a small, 8-sided, stuffed ornamental pincushion, usually made out of Aida cloth or linen. Embroidery or cross-stitch is used to decorate the top… (definition from wikipedia)
I have been fascinated by these little gems for quite a while. They are actually very easy to make-once you get past the embroidery and beading…
Anyways I also saw this on facebook:

The pattern is available on Ravelry at
http://www.ravelry.com/patterns/library/hexagon-pincushion
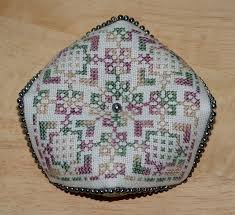
So I decided to have a little fun and I made this:
Certainly not as fancy but I think it is cute! Here is the other side:

Unfortunately the little biscornu inside is obscured but I still enjoyed making it. It is about 4 inches square.
This is how I made it:
I started with 2 charm square and 2 granny squares I had in my stash (What? You don’t have extra granny squares laying around?) The granny squares are about 4” square.

Draw your seam lines on the back of the fabric at 1/2”. I cheated and used a 4” sq. ruler to mark my charm patches. Also mark the halfway points on your square, I put hash marks. I hope you can see them.

You are going to start by sewing one corner of one square to the center of one side of the other square right sides together. I sewed by hand but if you are brave you can use your sewing machine. Just make sure you don’t sew into the seam allowance.

Your first seam will look like this:

In the above picture the corner of the top square is matched up to the center of the seam line on the bottom square. I sewed to the center of the seam of the top square which is pinned to the corner of the bottom square. I know it sounds confusing but it is simple to do.
Then you will sew from the center of your top square (which is at the corner of your bottom square-stay with me here!!) to your next corner (which is at the center of your bottom square)

Continue to sew around matching the corner from one square to the center of the side seam of the other square.


Keep sewing until you have one section left to sew (You will have sewn 7 sections.)
Are you still with me? Great! You will have something that looks like the picture below:

Clip your corners:

Turn right side out and push out your points.

At this point I like to press my seam allowance to the inside.

Stuff, and sew the last end closed. At this point you can call it done and attach two buttons (one on top and one on the bottom) to give the biscornu some dimension. Or you can cover the whole thing with 2 granny squares!

You will crochet the two squares together just like you sewed the fabric liner: corner to center of each side.

I just used a single crochet to sew them together:


When you are almost done, pop the liner inside and finish crocheting the edges together.

I made a simple edging by doing a single crochet, chain 3, skip 1 space and single crochet all around.

Attach your buttons and you are done! The whole pincushion took about 1 and 1/2 hours. If I do another one, I will make my granny squares with a DK or sport weight yarn. Enjoy!


